> For the complete documentation index, see [llms.txt](https://docs.augelab.com/llms.txt). Markdown versions of documentation pages are available by appending `.md` to page URLs; this page is available as [Markdown](https://docs.augelab.com/key-features/create-plugins-with-designer-window/coding-reference.md).
# Coding Reference
This page explains how to write **Custom Blocks** for AugeLab Studio Designer.
Custom Blocks are plain Python classes that subclass `Block`, define sockets/components in `init()`, and process data in `run()`.
## Quick Start
* Start your script with `from studio.custom_block import *` (mandatory).
* Create a class that subclasses `Block`.
* Set `op_code` to the **exact class name**.
* Implement `init()` to configure sockets and UI components.
* Implement `run()` to read inputs and write outputs.
* Register the block at the bottom with `add_block(...)`.
{% hint style="info" %}
Designer Window extracts your block name from the first `class MyBlock(Block):` it can find, replaces tabs with 4 spaces, writes `.py`, then imports it to validate.
{% endhint %}
{% code title="Example Custom Block (copy/paste friendly)" %}
```python
from studio.custom_block import *
try:
import numpy as np
except ImportError:
np = None
class Example_Block(Block):
op_code = "Example_Block" # Must match the class name
def init(self) -> None:
self.width = 200
self.height = 150
self.tooltip = "Adds a constant to the input image."
# Socket names become keys for self.input[...] and self.output[...]
self.input_sockets = [SocketTypes.ImageAny("Input Image")]
self.output_sockets = [SocketTypes.ImageAny("Output Image")]
# Components are stored by name in self.param
self.param["Increment"] = TextInput(
text="1",
place_holder="integer",
tool_tip="Value added to every pixel.",
)
def run(self) -> None:
if np is None:
return
img = self.input["Input Image"].data
inc = int(self.param["Increment"].value)
self.output["Output Image"].data = img + inc
add_block(Example_Block.op_code, Example_Block)
```
{% endcode %}
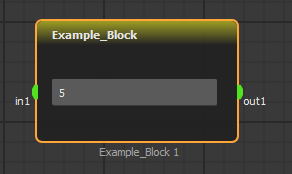
Example Custom Block
## Bootstrap Phase
### Mandatory Imports
Every Custom Block script must begin with `from studio.custom_block import *`.
It provides `Block`, `SocketTypes`, Designer components (TextInput, Slider, …), and `add_block`.
### Importing Community Modules
You may import third-party packages (NumPy, OpenCV, …) and use them inside `run()`.
If you install packages via the **Import Package Window**, make sure they work on all target platforms where your scenario will run.
{% hint style="warning" %}
All blocks shipped with AugeLab Studio are cross-platform compatible. Installing or importing community modules may reduce portability.
{% endhint %}
## Class Definition
The class name becomes the block name shown in the Custom Blocks list.
You can add helper methods and internal state as needed.
### Core Attributes & Methods
### `Block.op_code: str`
Unique identifier for your block.
For Designer-generated blocks, `op_code` should be the same as the class name.
{% hint style="info" %}
Keeping `op_code` and socket names stable helps Studio reconnect nodes when you update a block.
{% endhint %}
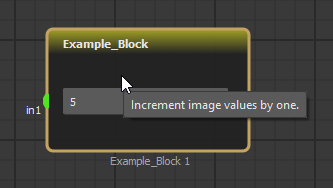
### `Block.tooltip: str`
Tooltip text shown when the user hovers over the block.
Tooltip shown on custom block
### `Block.init(self) -> None`
Called when the block is created (drag-drop), duplicated (copy/paste), or loaded from a scenario file.
Use this method to configure the block UI and sockets:
* Define `input_sockets` and `output_sockets`
* Create components in `self.param` (TextInput, DropDown, Slider, ...)
* Load and register resource paths if needed
### `Block.run(self) -> None`
Executed on every scenario step.
Read from `self.input`, write to `self.output`, and (optionally) update component state.
## Sockets & Data Flow
### `Block.input_sockets: list[SocketType]`
Defines which inputs the block accepts.
Each socket has a visible **name**; that same name becomes the key you use in `self.input[...]`.
Socket constructor
```python
SomeSocketClass(SocketTypes.BaseSocketClass):
def __init__(self, name: str = "", multiple: bool = False):
"""
name: text shown beside the socket graphics
multiple: draw a horizontal line to indicate a list-type socket
"""
...
```
Available socket types
| Socket type | Typical payload |
| --------------------------------------------- | ------------------------ |
| `ImageAny`, `ImageRGB`, `ImageGray` | `numpy.ndarray` |
| `Mask` | `numpy.ndarray` |
| `Integer` | `int` |
| `Number` | `int` or `float` |
| `Boolean` | `bool` |
| `String` | `str` |
| `Generic` | any object |
| `Shape`, `Contour`, `Range`, `Pixel`, `Point` | depends on upstream node |
{% hint style="info" %}
Exact payload types depend on runtime and upstream nodes. Commonly you'll see `numpy.ndarray` for images/masks and Python primitives (`int`, `float`, `bool`, `str`) for numeric/text sockets.
{% endhint %}
### `Block.output_sockets: list[SocketType]`
Same concept as inputs: define outputs and then write data by socket name using `self.output["Name"].data = ...`.
### `Block.input: dict[str, object]`
Runtime map of input socket names to objects that carry the payload in `.data`.
Each input also tracks connection state in `.is_connected`. If an input is not connected, `.data` is set to `None`.
```python
class Example_Block(Block):
def init(self) -> None:
self.input_sockets = [
SocketTypes.ImageAny("Image"),
SocketTypes.Number("Constant"),
]
def run(self) -> None:
image = self.input["Image"].data
constant = self.input["Constant"].data
...
```
### `Block.output: dict[str, object]`
Runtime map of output socket names to objects that carry the payload in `.data`.
```python
class Example_Block(Block):
def init(self) -> None:
self.output_sockets = [
SocketTypes.ImageAny("Result"),
SocketTypes.Number("Detections"),
]
def run(self) -> None:
self.output["Result"].data = img_detections_drawn
self.output["Detections"].data = n_detections
```
## Components (Block UI)
### `Block.param: dict[str, Component]`
Components are stored in `self.param` by a unique name you choose.
Use them to configure your block UI (text fields, sliders, buttons, images, tables, etc.).
* [Text Input](/key-features/create-plugins-with-designer-window/components.md#text-input)
* [Drop Down List](/key-features/create-plugins-with-designer-window/components.md#drop-down-list)
* [Label](/key-features/create-plugins-with-designer-window/components.md#label)
* [Slider](/key-features/create-plugins-with-designer-window/components.md#slider) / [Slider Labeled](/key-features/create-plugins-with-designer-window/components.md#slider-labeled)
* [Check Box](/key-features/create-plugins-with-designer-window/components.md#checkbox)
* [Button](/key-features/create-plugins-with-designer-window/components.md#button)
* [Image](/key-features/create-plugins-with-designer-window/components.md#image)
* [Table](/key-features/create-plugins-with-designer-window/components.md#table)
## Resource Paths
### `Block.register_resource(name: str = "", path: str = "") -> str`
Registers a file/folder path so it is stored with the scenario and can be relocated with the project. This avoids hard-coded absolute paths breaking when a scenario is moved to another computer.
| Argument | Meaning |
| -------- | ---------------------------------- |
| `name` | Unique identifier for the resource |
| `path` | File/folder path to register |
Returns: `str` (the registered path)
To retrieve the stored path later, use `get_resource()`.
Example: let the user choose a file once
```python
from studio.custom_block import *
class LoadImage(Block):
op_code = "LoadImage"
def init(self):
self.width = 220
self.height = 180
self.output_sockets = [SocketTypes.ImageAny("Image")]
self.param["Pick File"] = Button(text="Pick File")
self.param["Pick File"].set_clicked_callback(self._pick_file)
def _pick_file(self):
path = QAFileDialog.getOpenFileName(
caption="Choose an image",
directory="",
filter="Image Files (*.png *.jpg *.jpeg *.bmp)",
)
if path:
self.register_resource("image_path", path)
def run(self):
path = self.get_resource("image_path")
if not path:
return
# TODO: load the image from 'path' and set self.output["Image"].data
add_block(LoadImage.op_code, LoadImage)
```
### `Block.get_resource(name: str = "") -> str`
Returns the registered path for a given resource name.
## File Dialogs
### `QAFileDialog`
Static helper for showing file/folder pickers. These dialogs return a path chosen by the user.
{% hint style="info" %}
Use file dialogs inside callbacks (e.g. a `Button` click), not inside `run()`.
{% endhint %}
#### `QAFileDialog.getOpenFileName(**kwargs)`
| Argument | Meaning |
| --------------------- | ----------------------------------------------------- |
| `caption: str = ""` | Dialog title |
| `directory: str = ""` | Start directory |
| `filter: str = ""` | File filter, e.g. `"Image Files (*.png *.jpg *.bmp)"` |
Returns: `str` (selected file path)
#### `QAFileDialog.getExistingDirectory(**kwargs)`
| Argument | Meaning |
| --------------------- | --------------- |
| `caption: str = ""` | Dialog title |
| `directory: str = ""` | Start directory |
Returns: `str` (selected directory path)
## Registration
### `add_block(My_Block.op_code, My_Block)`
Registers your block so it appears in the Designer. This is typically generated for you by the Designer Window. If you modify it, keep `op_code` and the class name consistent.