# When to Stop Training

Training doesn’t need to run “forever”. In real projects, the best results come from stopping at the right moment:

* not too early (model hasn’t learned yet)
* not too late (model starts to overfit / memorize)

{% hint style="info" %}
In AugeLab Studio, training usually ends when it reaches the configured **max iterations**, or when you click **Stop Training**. The Training Chart helps you decide whether it’s worth continuing.
{% endhint %}

If this is your first training, start with the [Starter Checklist](#starter-checklist).

## Monitor Training Progress <a href="#monitor-training-progress" id="monitor-training-progress"></a>

During training, monitor the progress of the model and watch the relationship between:

* Loss
* mAP
* IOU
* Iterations

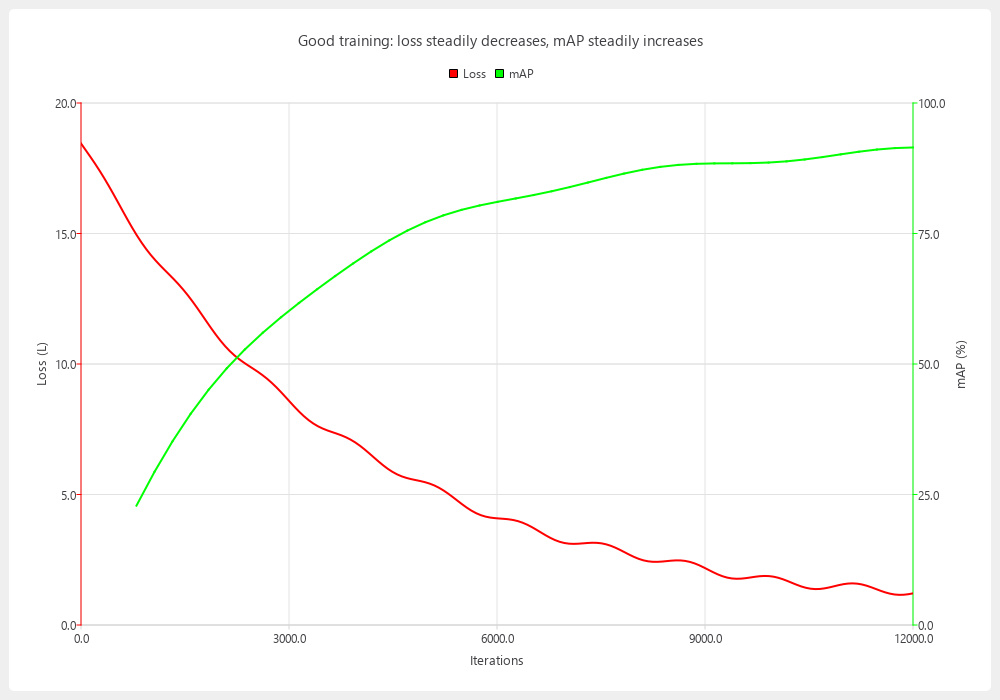
Loss and mAP are shown on a chart like below:

<figure><img src="/files/PDnVAECN6LdxEW4ypgm4" alt="Good training example chart"><figcaption><p>Example: Good training (loss decreases, mAP increases then plateaus)</p></figcaption></figure>

{% hint style="warning" %}
All metrics can wildly vary by:

* Data variety
* Data size
* Annotation accuracy
* Model size

Numbers below are only provided for setting an initial ground for newcomers.
{% endhint %}

### Quick Rule (what usually works) <a href="#quick-rule" id="quick-rule"></a>

If you only remember one rule:

Stop when validation mAP stops improving for a long time, or when it starts going down while loss keeps going down.

That second case is the classic sign of overfitting.

### Common Training Patterns (cheat sheet) <a href="#common-patterns" id="common-patterns"></a>

These patterns are common in real use. For each one, look at the chart first, then read the explanation.

{% hint style="info" %}
These example charts are generated for training/documentation purposes. In your repository, place them under the .assets/ folder next to this page.
{% endhint %}

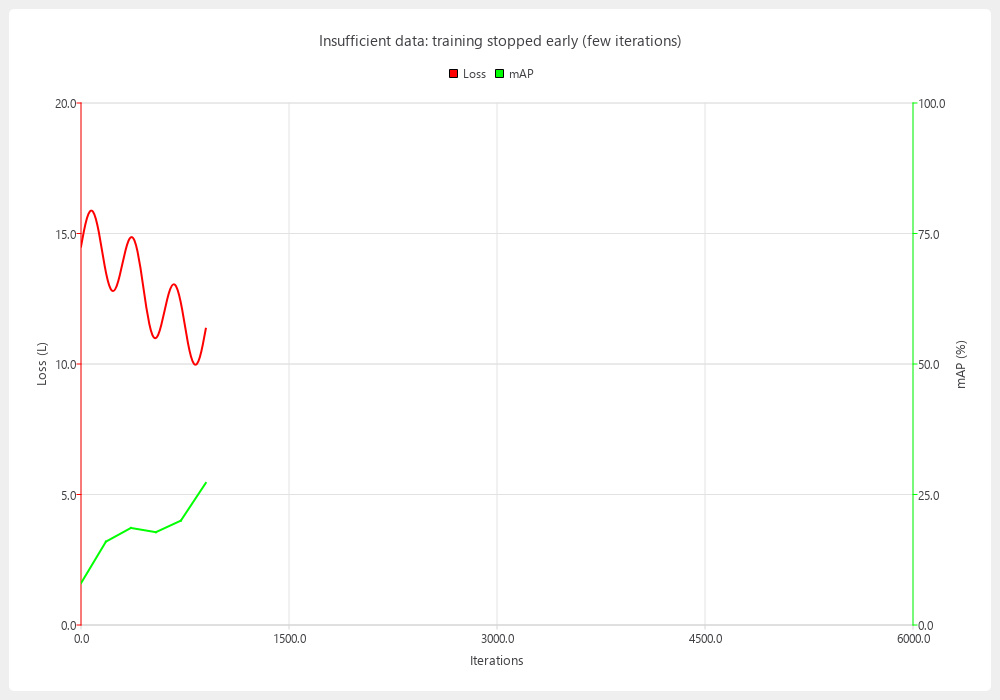
#### Insufficient data <a href="#examples-insufficient-data" id="examples-insufficient-data"></a>

<figure><img src="/files/WnAKIwqKfHWzWMOoFTa9" alt="Insufficient data example chart"><figcaption><p>Insufficient data: too few points / too short run (noisy early metrics)</p></figcaption></figure>

Explanation:

* What it means: you don’t have enough signal yet to trust the trend.
* Likely causes: too few images, too short run, weak/too small validation split.
* What to do: train longer; add data; ensure validation exists and includes real variety.

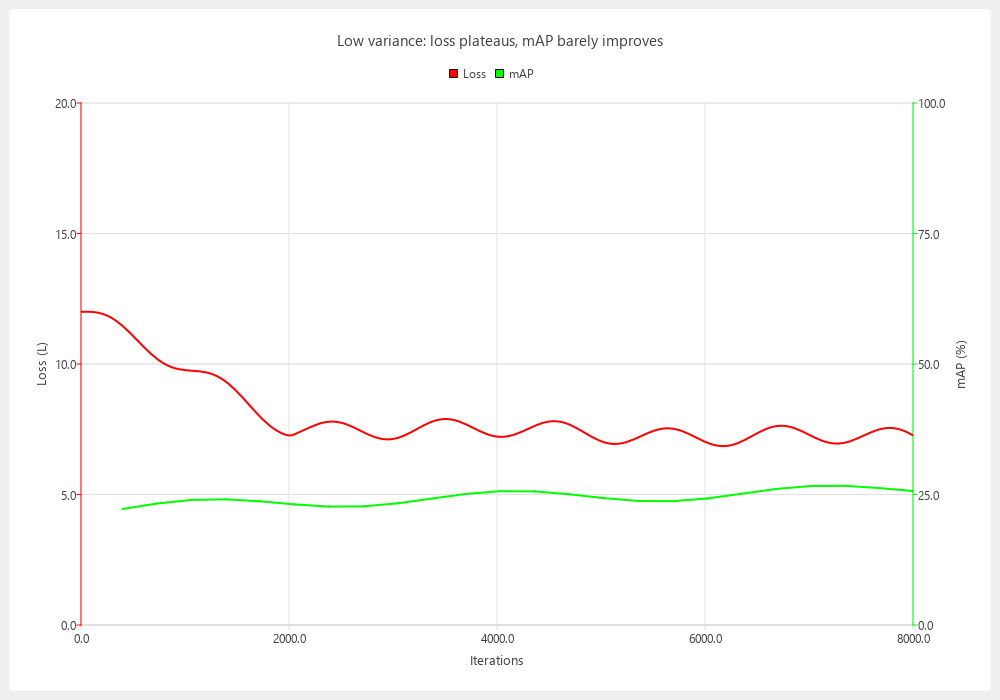
#### Low variance <a href="#examples-low-variance" id="examples-low-variance"></a>

<figure><img src="/files/tzexJN7KjF4AaDBlcdAR" alt="Low variance example chart"><figcaption><p>Low variance: loss plateaus and mAP barely improves</p></figcaption></figure>

Explanation:

* What it means: the model learns the “easy repetition” quickly, then stops getting new information.
* Likely causes: repetitive dataset (same background/angle/light), missing negatives, missing edge cases.
* What to do: add variety (angles, backgrounds, lighting), add negatives, capture hard cases on purpose.

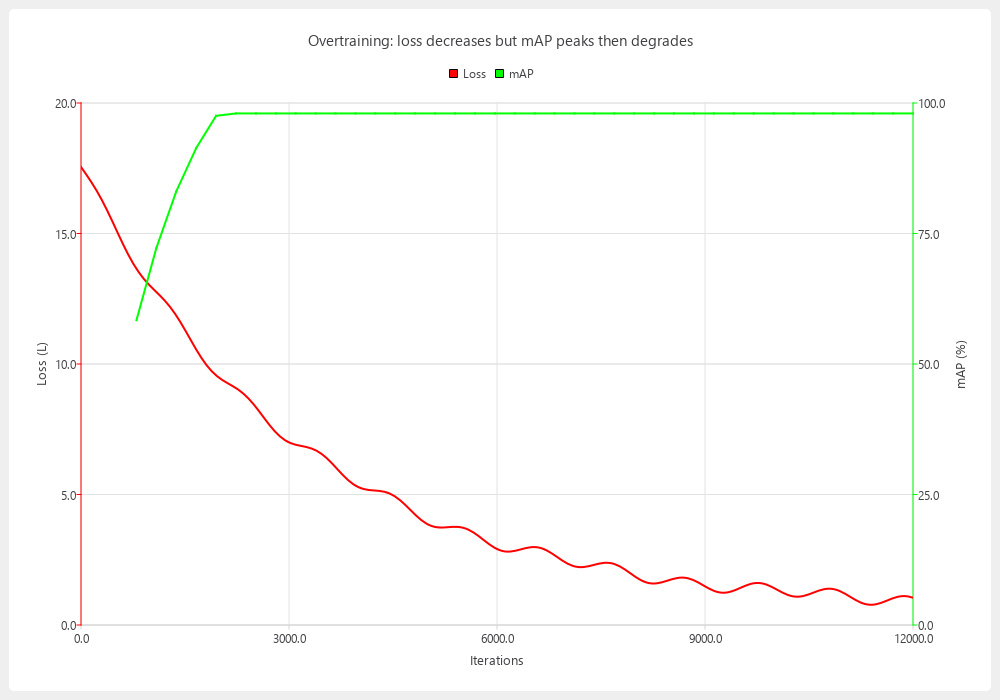
#### Overtraining <a href="#examples-overtraining" id="examples-overtraining"></a>

<figure><img src="/files/LduyNB0HqvauUuCh58M9" alt="Overtraining example chart"><figcaption><p>Overtraining: loss keeps improving, but mAP peaks (even very high) and then degrades</p></figcaption></figure>

Overtraining is not always catastrophic, but it usually indicates memorization rather than generalization. For strict environments (fixed camera, fixed lighting), it is acceptable.

* What it means: the model is getting better at the training set, but worse at validation (memorization).
* Likely causes: not enough variety, too-small validation, duplicates/near-duplicates.
* What to do: stop and keep best weights; add more variety; increase validation split; remove duplicates.

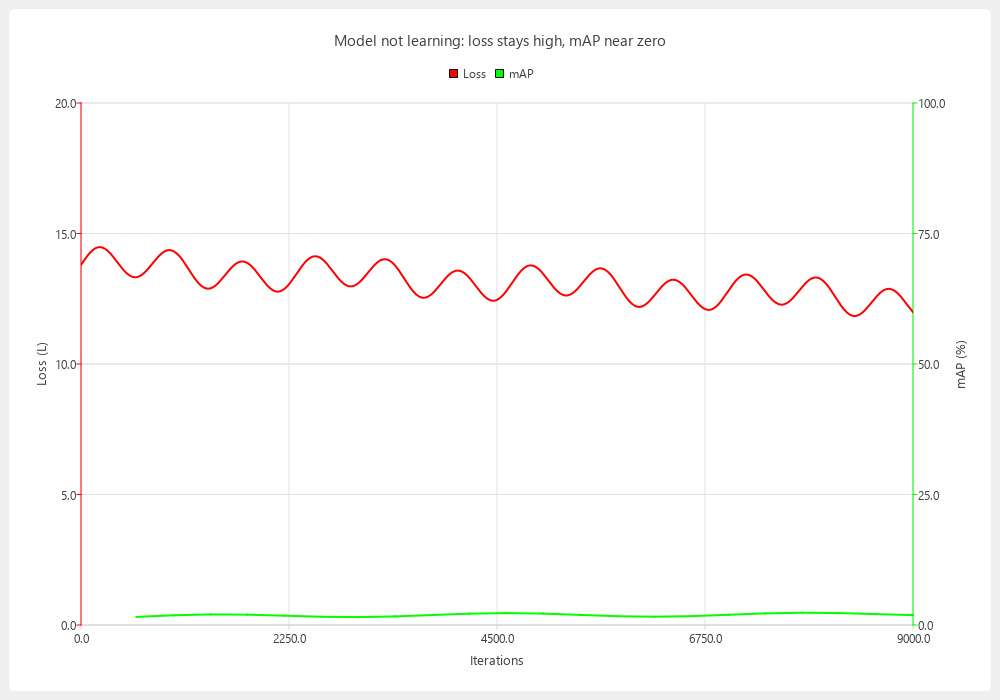
#### Model not learning <a href="#examples-not-learning" id="examples-not-learning"></a>

<figure><img src="/files/ciTTvQDwPDqU7Lenyp1W" alt="Model not learning example chart"><figcaption><p>Model not learning: loss stays high/flat, mAP stays near zero</p></figcaption></figure>

Explanation:

* What it means: training is not progressing in a meaningful way.
* Likely causes: wrong labels/classes, class IDs mismatch, broken annotation format, incorrect config/settings.
* What to do: verify `.names` order vs label IDs; spot-check labels; confirm YOLO format; adjust training settings.

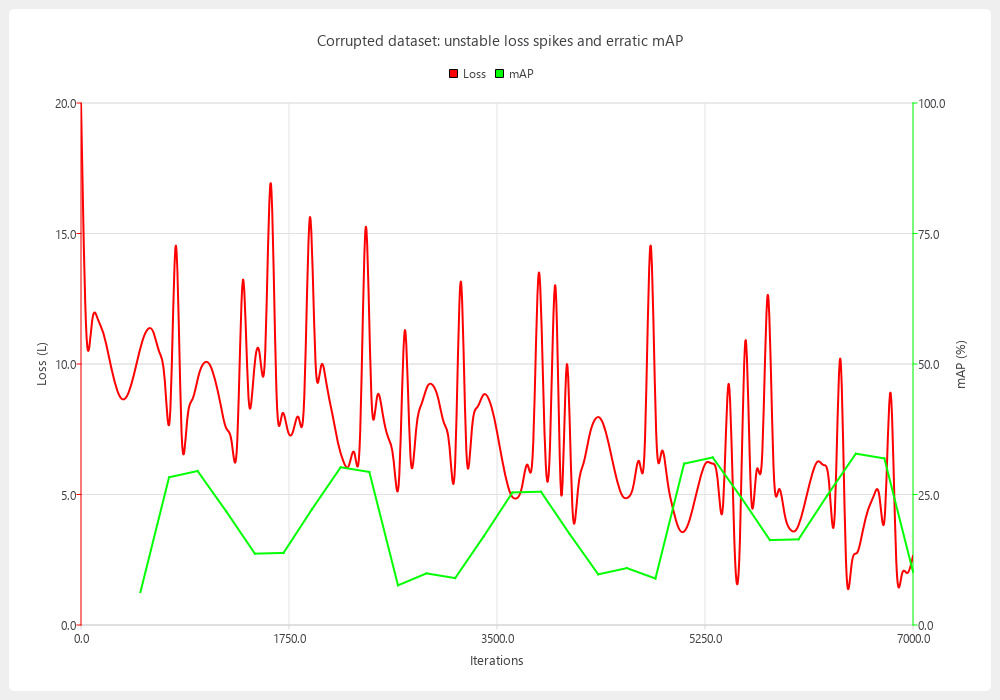
#### Corrupted dataset <a href="#examples-corrupted" id="examples-corrupted"></a>

<figure><img src="/files/npxJRiNPstdw7xiy9s3d" alt="Corrupted dataset example chart"><figcaption><p>Corrupted dataset: unstable loss spikes and erratic mAP</p></figcaption></figure>

Explanation:

* What it means: training is being disrupted by inconsistent or broken data.
* Likely causes: corrupted image files, invalid labels, mixed sources/resolutions, “empty-but-contains-objects” images.
* What to do: run dataset checks; remove corrupted data; fix label format; re-export a clean set.

#### Good training <a href="#examples-good" id="examples-good"></a>

<figure><img src="/files/PDnVAECN6LdxEW4ypgm4" alt="Good training example chart"><figcaption><p>Good training: steady learning and a stable high plateau</p></figcaption></figure>

Explanation:

* What it means: healthy learning and generalization.
* Likely causes: consistent labels + enough variety.
* What to do: stop when mAP plateaus; validate on real footage / a “golden set”; deploy best weights.

### Loss <a href="#loss" id="loss"></a>

Loss is a training-fit signal. It represents how well the model is fitting the training batches.

Loss is useful, but it can be misleading:

* Loss can keep decreasing even when the model is already overfitting.
* Loss does not guarantee “real-world performance”.

{% hint style="info" %}
Loss alone is not enough to judge accuracy. Use [mAP](#map) to understand generalization on validation data.
{% endhint %}

#### \*\*2.0 ≥\*\* Loss <a href="#id-20-loss" id="id-20-loss"></a>

Often indicates “learning has started”, but quality may still be poor. Use it as a sign that the pipeline works, not as a finish line.

{% hint style="warning" %}
As shown in the graph above, loss values around 2.0 may not produce accurate models.
{% endhint %}

#### \*\*1.0 ≥\*\* Loss <a href="#id-10-loss" id="id-10-loss"></a>

Commonly a usable baseline on many focused datasets.

#### \*\*0.5 ≥\*\* Loss <a href="#id-05-loss" id="id-05-loss"></a>

Often indicates a well-fit model on a clean, consistent dataset. After this point improvements can be slow, and overfitting risk increases.

<details>

<summary>Loss thresholds are not universal (why)</summary>

Loss values depend on model architecture, image size, classes, label noise, augmentation, and dataset complexity. Use loss thresholds to build intuition, not as a universal pass/fail.

</details>

### mAP <a href="#map" id="map"></a>

The mAP (mean average precision) metric combines both precision and recall to provide a comprehensive evaluation of the model's accuracy in detecting objects in an image.

It is calculated by evaluating predictions against ground-truth labels at specific IoU thresholds (exact details depend on the training backend/settings).

{% hint style="warning" %}
mAP is only as good as your validation set. If validation images are too few, too “clean”, too similar to training, or mislabeled, mAP can look great while the model fails in production.
{% endhint %}

Practical interpretation:

* A stable plateau is often more important than chasing the last +1%.
* Very high mAP (like 95–99%) on a small or repetitive dataset is a common overfitting trap.
* If mAP peaks then drops, see [Over-Fitting](#over-fitting).

### IOU <a href="#iou" id="iou"></a>

IOU (Intersection over Union) measures the overlap between predicted and true bounding boxes for individual object detections. mAP evaluates the overall performance of the object detection model across all object categories, considering both precision and recall.

{% hint style="info" %}
Higher the IOU value, tighter the predicted box is.
{% endhint %}

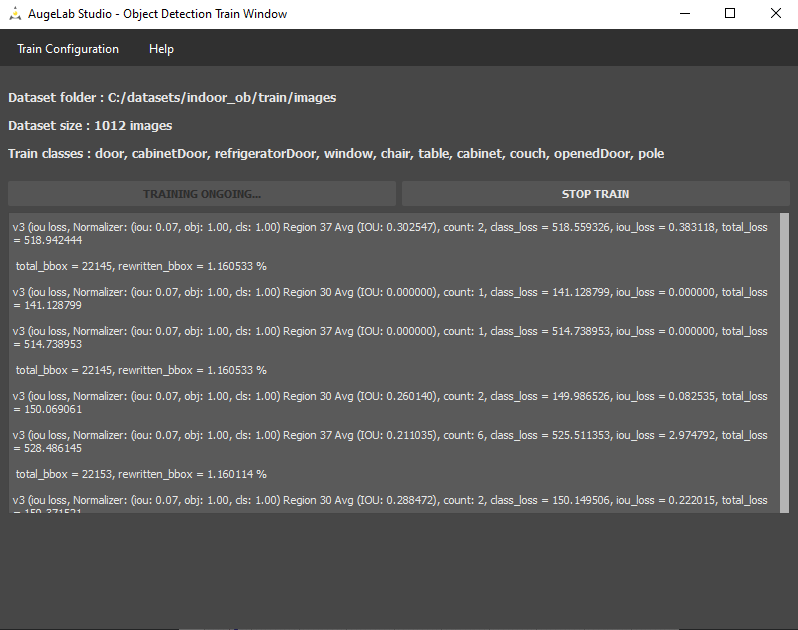
You can track each IOU in Training Window loggings:

<figure><img src="/files/MqsTImBfLKSgVicfD1kB" alt=""><figcaption></figcaption></figure>

## Fine Tuning <a href="#fine-tuning" id="fine-tuning"></a>

### Training Time <a href="#training-time" id="training-time"></a>

Define a maximum training time budget based on available computational resources and project constraints. If the model does not achieve satisfactory performance within the allocated time, consider stopping training and exploring other approaches such as:

* Manually analyze annotation accuracy
* Check class variety
* Choose different model sizes and batch sizes
* Increase database size

### Over-Fitting <a href="#over-fitting" id="over-fitting"></a>

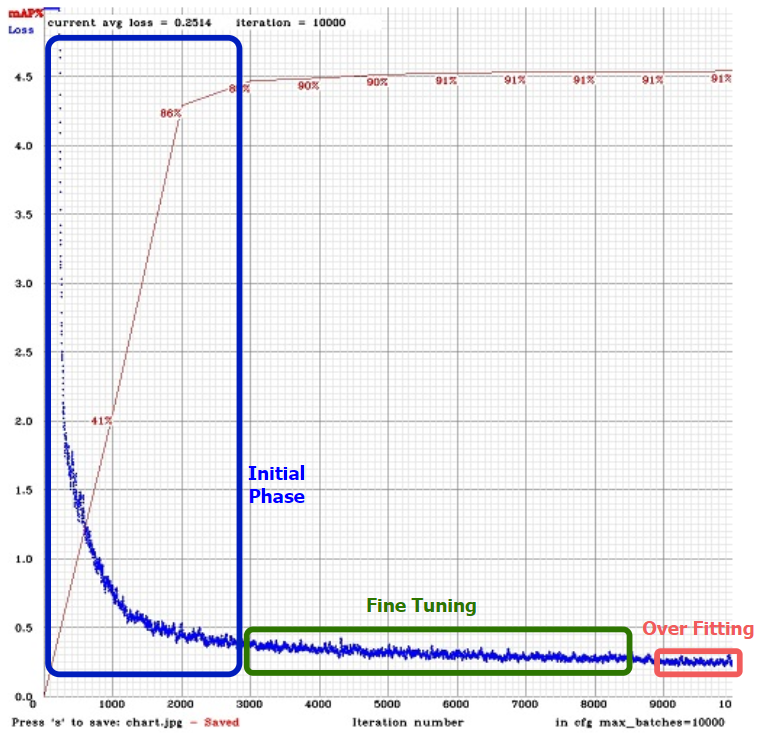
Avoid overfitting by monitoring how mAP behaves over time.

The most reliable “real life” overfit signal is:

loss decreases, but mAP peaks and then gets worse.

Overfitting is not always “catastrophic” on very constrained, fixed-camera setups. But if you care about robustness (different lighting, different shifts, different backgrounds), overfitting will show up quickly.

What usually helps:

* Add more variety (new days, new lighting, new backgrounds)
* Add negatives that look like your real environment
* Tighten label consistency (same style across labelers)
* Increase validation split so mAP is harder to “cheat”

<figure><img src="/files/NumGWCcgXPuUCLjdoeHq" alt="" width="563"><figcaption></figcaption></figure>

<figure><img src="/files/LduyNB0HqvauUuCh58M9" alt="Overtraining example chart"><figcaption><p>Overtraining example: mAP peaks then drops while loss continues decreasing</p></figcaption></figure>

### Balancing Time and Performance <a href="#balancing-time-and-performance" id="balancing-time-and-performance"></a>

Balance the training time with the desired model performance. In some cases, additional training iterations may improve performance, but the returns may diminish over time. Weigh the benefits against the computational cost and the urgency of the project.

Usually, depending on class numbers and database size, training process length can vary between a day or a week.

## Starter Checklist <a href="#starter-checklist" id="starter-checklist"></a>

Database:

* [ ] Labels are consistent (box style + class meaning)
* [ ] Dataset has real-world variety (lighting, angles, backgrounds)
* [ ] You have enough examples per class to learn (more is better; start small, then improve)
* [ ] (Optional) Augmentation is enabled *after* labels are correct

Model:

* [ ] Chosen a model size that meets FPS requirements
* [ ] Right model for the right [system requirements](/introduction/system-requirements.md) and CUDA compatibility, GPU memory.
* [ ] Batch size according to GPU memory (use subdivisions to avoid OOM)

Training (stop if):

* [ ] [mAP](#map) plateaus for a long time (diminishing returns)
* [ ] [mAP](#map) falls while [Loss](#loss) continues falling (overfitting)
* [ ] You hit your time budget and results are “good enough” to test on real footage

<details>

<summary>Fast debugging checklist (when things look wrong)</summary>

1. Spot-check 20–50 images across the dataset (not just the first page)
2. Confirm class mapping:

* `.names` file order matches label IDs
* no missing/extra classes

3. Spot-check label files:

* YOLO format: `class x_center y_center width height` (normalized)
* boxes are in-bounds and not zero-sized

4. If mAP looks “too good to be true”:

* validation split may be too small or too similar to training
* you may have duplicates / near-duplicates

5. If training is unstable or OOM:

* increase subdivisions or reduce batch
* temporarily reduce input resolution to debug

</details>


---

# Agent Instructions: Querying This Documentation

If you need additional information that is not directly available in this page, you can query the documentation dynamically by asking a question.

Perform an HTTP GET request on the current page URL with the `ask` query parameter:

```
GET https://docs.augelab.com/key-features/train-custom-ai-models-with-training-window/when-to-stop-training.md?ask=<question>
```

The question should be specific, self-contained, and written in natural language.
The response will contain a direct answer to the question and relevant excerpts and sources from the documentation.

Use this mechanism when the answer is not explicitly present in the current page, you need clarification or additional context, or you want to retrieve related documentation sections.