> For the complete documentation index, see [llms.txt](https://docs.augelab.com/llms.txt). Markdown versions of documentation pages are available by appending `.md` to page URLs; this page is available as [Markdown](https://docs.augelab.com/key-features/create-plugins-with-designer-window.md).
# Create Plugins
Develop custom nodes using the power of Python.
## First Look
Designer Window is the fastest way to go from “I need a special node” → “I can use it in my scene”.
You write (or generate) a small Python class (a `Block`), press **CREATE BLOCK**, and it shows up in the Custom Blocks list.
{% hint style="info" %}
If you like starting from a working template, open [Coding Reference](/key-features/create-plugins-with-designer-window/coding-reference.md) and copy the sample block.
{% endhint %}
### Quick Start
Follow these steps once, then come back and explore the details.
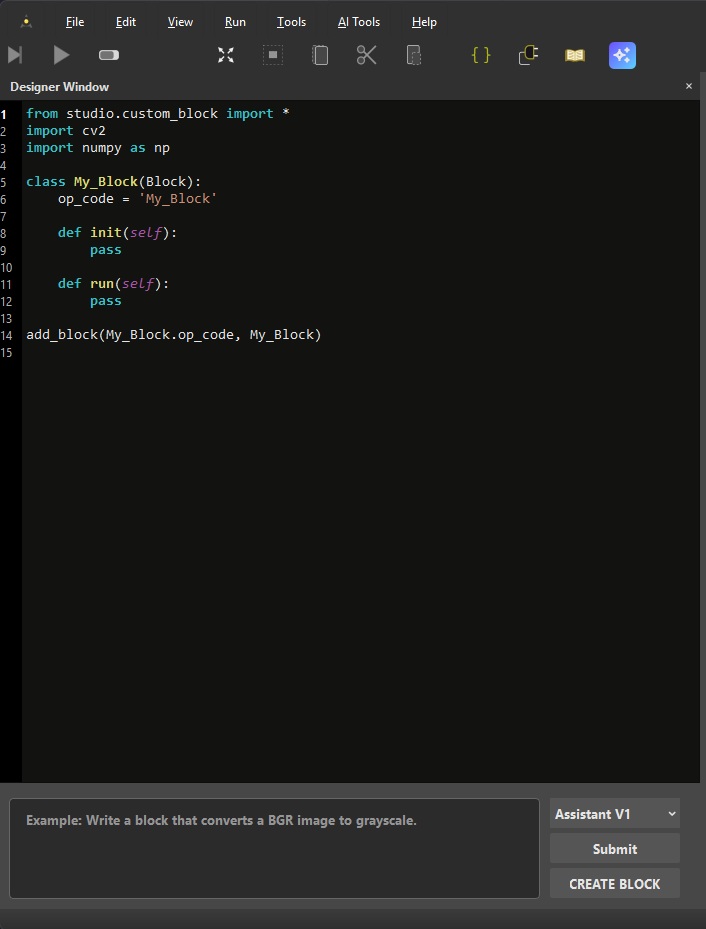
1. Open **Designer Window**.
2. Keep the default script, or paste your own or prompt your way with AI agent.
3. Make sure the script ends with `add_block(...)`.
4. Press **CREATE BLOCK**.
5. Find your block in the **Custom Blocks** list and drag-drop it into a scene.
{% hint style="success" %}
Tip: Keep your socket names stable. It makes updating a block much smoother.
{% endhint %}
### Code Editor
The big editor area is the source of truth for your block.
Your script must include (minimum):
* `from studio.custom_block import *`
* A class that inherits from `Block`
* A matching `op_code`
* A final `add_block(MyBlock.op_code, MyBlock)` line
{% hint style="warning" %}
On creation, AugeLab Studio normalizes indentation by replacing tabs with 4 spaces before saving.
{% endhint %}
### AI Assistant
At the bottom of Designer Window you can:
* Write a prompt (example: “Write a block that converts a BGR image to grayscale”)
* Be descriptive for the best results.
* As of now, custom blocks assistant is free to use.
* Choose a model from the dropdown
* Press **Submit** to generate code into the editor
This is meant to get you started quickly. You’re always in control—review and edit the code before you press **CREATE BLOCK**.
{% hint style="info" %}
AI agent remembers your previous prompts, you can ask for improvements or changes.
{% endhint %}
{% hint style="warning" %}
The AI feature may be unavailable depending on license, connectivity, or server status.
{% endhint %}
### Updating an Existing Block
When you press **CREATE BLOCK** again:
* The file is overwritten.
* The Custom Blocks list entry is refreshed.
* Studio attempts a best-effort *safe replace* in open scenes (it tries to preserve connections).
{% hint style="info" %}
If you renamed sockets, Studio may reconnect by index as a fallback. That’s why stable socket names matter.
{% endhint %}
Advanced: What CREATE BLOCK actually does
* Studio finds the first class inheriting from `Block` and uses its class name as the block name.
* Your script is saved as `.py` under the Marketplace custom blocks folder.
* Studio imports `custom_blocks.` and instantiates it once to validate it.
* If everything looks good, the block becomes available in the Custom Blocks list.
{% hint style="info" %}
File location: `.../AugeLab Studio/marketplace/custom_blocks/.py`
{% endhint %}
{% hint style="warning" %}
If import/validation fails, Studio shows the error and removes the file. Fix the script and try again.
{% endhint %}
### Reloading Blocks into Designer Window
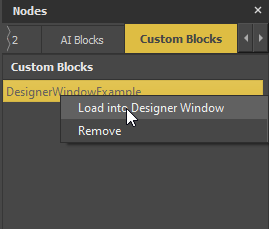
To edit an existing block, right-click its name in the Custom Blocks list and choose **Load into Designer Window**.
{% hint style="warning" %}
Loading a block into Designer Window only works for editable user scripts (`.py`). Compiled/encrypted blocks (for example `.pyd` or PyArmor-protected scripts) are intentionally blocked.
{% endhint %}
Load Existing Block
{% hint style="info" %}
“Reload” updates the Custom Blocks list (adds new files / removes deleted files). It does not hot-update nodes already placed in scenes.
{% endhint %}


 {% endhint %}